後書きと補足
お疲れ様です、これにてTkinterの解説講座は終了となります。
これまでの記事で、
- ウィジェット
- メインウィンドウ
- イベント
- ウィジェットの配置
について学習し、電卓のような簡単なデスクトップアプリを作れるようになりました。Label、Button、Entry以外のウィジェットの詳細や配置については説明を省略しましたが、配置とイベントが理解できていれば公式資料を参照してさらに複雑なデスクトップGUIアプリの作成はできるようになるでしょう。また、基本的な考え方は同じなので、他のライブラリを使ってより高度なGUIを作ることもできるようになると思います。
ここからはさらに学習を進められる方のために、混乱しがちな点や注意点について補足説明したいと思います。
補足1 オブジェクト指向スタイルでの書き方
Tkinterの書き方はこれまで解説してきた関数ベースの書き方とオブジェクト指向(以降OOPと記述)の2通りがあります。Tkinterの解説記事は多くありますが、これらの書き方が混在しているため混乱する学習者が多いようです。OOPスタイルでの簡単な例を解説します。例えば、ボタンをクリックしラベルに変更を加える場合、以下のようなコードを関数ベースで作成しました。
from tkinter import Tk, StringVar, Button, Label

# メインウィンドウ生成
root = Tk()

# メインウィンドウの設定
root.title("サンプル")

# ラベルの配置
text = StringVar()
text.set("処理はまだ実行されていません")
label = Label(root, textvariable=text)
label.pack()


# イベントハンドラ
def my_func(event):
    global text
    text.set("処理が実行されました")


# ボタンウィジェット配置、イベントを登録
button = Button(root, text='button1')
button.bind("<Button-1>", my_func)
button.pack()

# イベントループの開始
root.mainloop()
イベント処理で操作するため、ラベルのテキストをモジュール変数としてグローバルにアクセスしています。一方、OOPスタイルで記述する場合、ベースとなるウィンドウ等のウィジェットを継承して部品ごとにクラスで表現します。
from tkinter import Tk, StringVar, Button, Label


class App(Tk):
    def __init__(self):
        super().__init__()

        # メインウィンドウの設定
        self.title('サンプル')
        self.geometry('300x50')

        # ラベルの配置
        self.text = StringVar()
        self.text.set("処理はまだ実行されていません")
        self.label = Label(self, textvariable=self.text)
        self.label.pack()

        # ボタンウィジェット配置、イベントを登録
        self.button = Button(self, text='button1')
        self.button.bind("<Button-1>", self.button_clicked)
        self.button.pack()

    def button_clicked(self, event):
        self.text.set("処理が実行されました")


root = App()
root.mainloop()
メインウィンドウなどの単位で継承し、インスタンス変数でやり取りする分、OOPに慣れている方は可読性が上がったと感じたのではないでしょうか。Pythonの基本文法が理解できている方はすんなりと移行できると思いますが、オブジェクト指向が苦手な方も書き方が2通りあるということは知っておいてください。
補足2 TkとTtkとデザイン性
TkinterにはTtkと呼ばれるウィジェットのセットが用意されています。Tkinterは解説資料によって扱っているウィジェットがtkinterだったりttkだったりするため注意が必要です。
TkinterとTtkのウィジェットの違いですが、Ttkは予め一定のスタイルが適用されたウィジェットです。
Tkinterと比較して見た目に統一感がありデフォルトでもある程度きれいに見える一方、一部のパラメータが省略されているため細かい設定ができない場合があります。
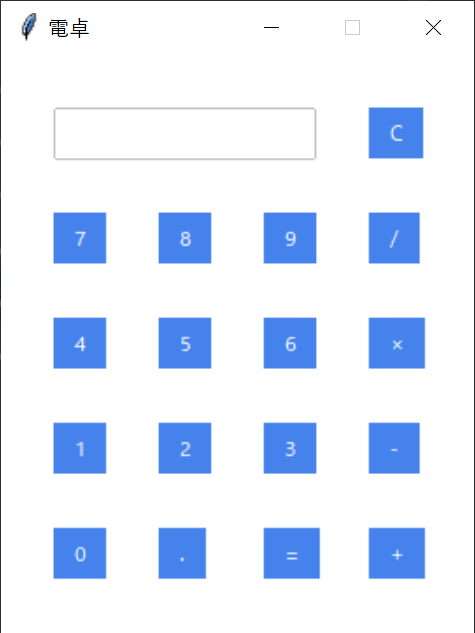
「きれい」といってもそれほど大差があるわけではないため、よりデザイン性を重視したい場合はサードパーティ制のテーマを使用するか、別のGUIツールキットを使用することをおすすめします。
例えば、ttkbootstrapというサードパーティ製ライブラリを使用すると、前ページで作成した電卓アプリが以下のようにBootstrap風になります。
動かし方ですが、以下のコマンドでインストールし、
pip install ttkbootstrap
ウィジェットをttkbootstrapのものに変更し、自分で設定したスタイル指定をばっさり削除しています。
from tkinter import StringVar, Tk
from ttkbootstrap import Button, Entry

entry_text = ""
entry_var: StringVar


def press_num_ope_event_handler(key):
    def handler():
        global entry_text
        entry_text = entry_text + str(key)
        entry_var.set(entry_text)

    return handler


def press_equal_event_handler():
    try:

        global entry_text
        total = str(eval(entry_text))
        entry_var.set(total)
        entry_text = str(total)

    except:
        # 0除算等、エラー発生時
        entry_var.set("ERR!")
        entry_text = ""


def press_clear_event_handler():
    global entry_text
    entry_text = ""
    entry_var.set("")


def main():
    root = Tk()
    root.configure(background="#E0E0E0")
    root.title("電卓")
    root.geometry("270x330")
    root.resizable(False, False)

    global entry_var
    entry_var = StringVar()

    # 上から1段目
    num_entry = Entry(root, textvariable=entry_var, justify='right')
    num_entry.place(x=30, y=30, width=150, height=30)
    clear = Button(root, text='C', command=press_clear_event_handler)
    clear.place(x=210, y=30)

    # 上から2段目
    btn7 = Button(root, text='7', command=press_num_ope_event_handler(7))
    btn7.place(x=30, y=90)
    btn8 = Button(root, text='8', command=press_num_ope_event_handler(8))
    btn8.place(x=90, y=90)
    btn9 = Button(root, text='9', command=press_num_ope_event_handler(9))
    btn9.place(x=150, y=90)
    divide = Button(root, text='/', command=press_num_ope_event_handler('/'))
    divide.place(x=210, y=90)

    # 上から3段目
    btn4 = Button(root, text='4', command=press_num_ope_event_handler(4))
    btn4.place(x=30, y=150)
    btn5 = Button(root, text='5', command=press_num_ope_event_handler(5))
    btn5.place(x=90, y=150)
    btn6 = Button(root, text='6', command=press_num_ope_event_handler(6))
    btn6.place(x=150, y=150)
    multiply = Button(root, text='×', command=press_num_ope_event_handler('*'))
    multiply.place(x=210, y=150)

    # 上から4段目
    btn1 = Button(root, text='1', command=press_num_ope_event_handler(1))
    btn1.place(x=30, y=210)
    btn2 = Button(root, text='2', command=press_num_ope_event_handler(2))
    btn2.place(x=90, y=210)
    btn3 = Button(root, text='3', command=press_num_ope_event_handler(3))
    btn3.place(x=150, y=210)
    minus = Button(root, text='-', command=press_num_ope_event_handler('-'))
    minus.place(x=210, y=210)

    # 上から5段目
    btn0 = Button(root, text='0', command=press_num_ope_event_handler(0))
    btn0.place(x=30, y=270)
    decimal = Button(root, text='.', command=press_num_ope_event_handler('.'))
    decimal.place(x=90, y=270)
    equal = Button(root, text='=', command=press_equal_event_handler)
    equal.place(x=150, y=270)
    plus = Button(root, text='+', command=press_num_ope_event_handler('+'))
    plus.place(x=210, y=270)

    root.mainloop()


if __name__ == "__main__":
    main()
補足3 exe化について
Webと比較してデスクトップアプリケーションはほぼ廃れた感もある今日ですが、クラウドソーシング等の小規模なPython案件でエンドユーザー向けにPythonバッチの起動・設定部分をTkinter等でGUI化すると、思いのほか大喜びされることがあります。Pythonはさらにサードパーティ製ライブラリを使用するとexe化も可能です。コマンドラインに抵抗がある方は以外と多いようなので一手間かけることで満足度や使い勝手、さらには単価が上がるかもしれません。GUI化と合わせて検討してみてください。