アプリケーションの完成
前回、デスクトップの電卓アプリのプロトタイプを作成しました。動作原理がわかったところで今回はコードを完成させてみましょう。といっても前回からの続きで残りの各ウィジェットをデザインに基づいてplaceで座標を設定し、イベントを登録するだけです。
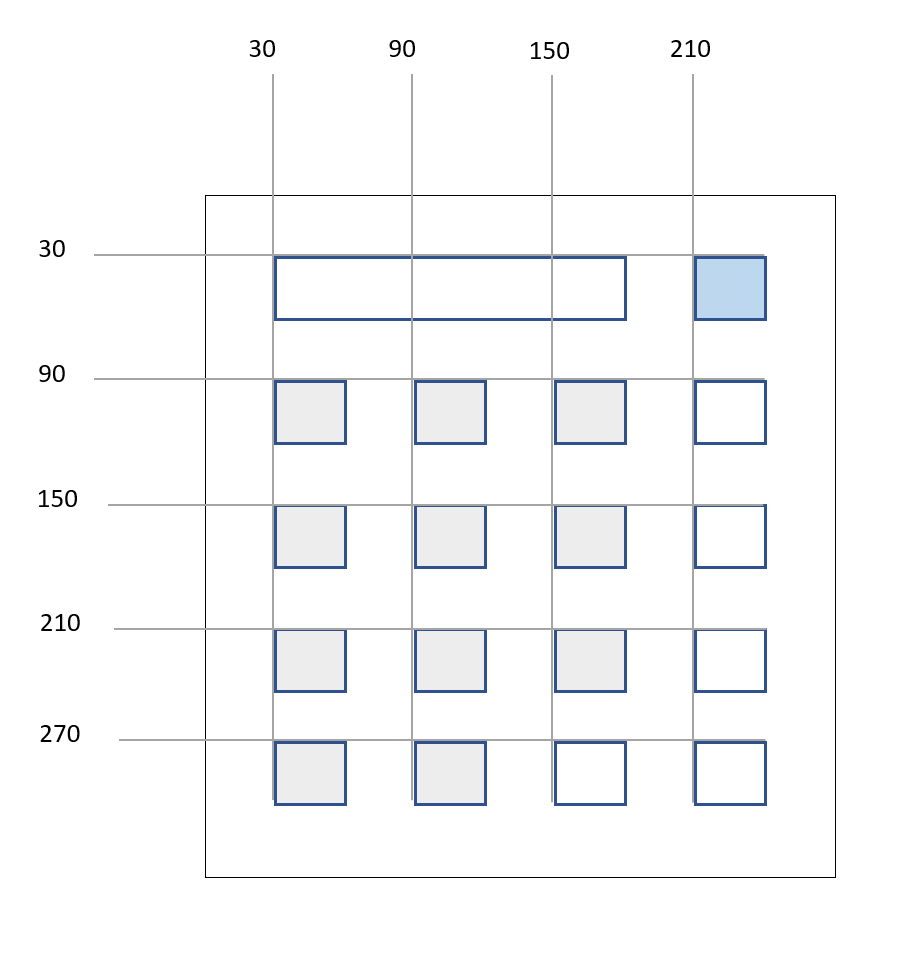
以下のコードはデザインに基づいて各数字ボタン、演算子ボタンを追加したものです。
from tkinter import StringVar, Tk, Button, Entry, PhotoImage

entry_text = ""
entry_var: StringVar


def press_num_ope_event_handler(key):
    def handler():
        global entry_text
        entry_text = entry_text + str(key)
        entry_var.set(entry_text)

    return handler


def press_equal_event_handler():
    try:

        global entry_text
        total = str(eval(entry_text))
        entry_var.set(total)
        entry_text = str(total)

    except:
        # 0除算等、エラー発生時
        entry_var.set("ERR!")
        entry_text = ""


def press_clear_event_handler():
    global entry_text
    entry_text = ""
    entry_var.set("")


def main():
    root = Tk()
    root.configure(background="#E0E0E0")
    root.title("電卓")
    root.geometry("270x330")
    root.resizable(False, False)

    global entry_var
    entry_var = StringVar()

    virtual_button_px = PhotoImage(width=1, height=1)
    button_params = dict()
    button_params["image"] = virtual_button_px
    button_params["height"] = 35
    button_params["width"] = 35
    button_params["compound"] = "c"
    button_params["fg"] = "#000000"

    # 上から1段目
    num_entry = Entry(root, textvariable=entry_var, justify='right')
    num_entry.place(x=30, y=30, width=150, height=30)
    clear = Button(root, text='C', background='#A0E0FF', command=press_clear_event_handler, **button_params)
    clear.place(x=210, y=30)

    # 上から2段目
    btn7 = Button(root, text='7', background='#E0E0E0', command=press_num_ope_event_handler(7), **button_params)
    btn7.place(x=30, y=90)
    btn8 = Button(root, text='8', background='#E0E0E0', command=press_num_ope_event_handler(8), **button_params)
    btn8.place(x=90, y=90)
    btn9 = Button(root, text='9', background='#E0E0E0', command=press_num_ope_event_handler(9), **button_params)
    btn9.place(x=150, y=90)
    divide = Button(root, text='/', background='#FFFFFF', command=press_num_ope_event_handler('/'), **button_params)
    divide.place(x=210, y=90)

    # 上から3段目
    btn4 = Button(root, text='4', background='#E0E0E0', command=press_num_ope_event_handler(4), **button_params)
    btn4.place(x=30, y=150)
    btn5 = Button(root, text='5', background='#E0E0E0', command=press_num_ope_event_handler(5), **button_params)
    btn5.place(x=90, y=150)
    btn6 = Button(root, text='6', background='#E0E0E0', command=press_num_ope_event_handler(6), **button_params)
    btn6.place(x=150, y=150)
    multiply = Button(root, text='×', background='#FFFFFF', command=press_num_ope_event_handler('*'), **button_params)
    multiply.place(x=210, y=150)

    # 上から4段目
    btn1 = Button(root, text='1', background='#E0E0E0', command=press_num_ope_event_handler(1), **button_params)
    btn1.place(x=30, y=210)
    btn2 = Button(root, text='2', background='#E0E0E0', command=press_num_ope_event_handler(2), **button_params)
    btn2.place(x=90, y=210)
    btn3 = Button(root, text='3', background='#E0E0E0', command=press_num_ope_event_handler(3), **button_params)
    btn3.place(x=150, y=210)
    minus = Button(root, text='-', background='#FFFFFF', command=press_num_ope_event_handler('-'), **button_params)
    minus.place(x=210, y=210)

    # 上から5段目
    btn0 = Button(root, text='0', background='#E0E0E0', command=press_num_ope_event_handler(0), **button_params)
    btn0.place(x=30, y=270)
    decimal = Button(root, text='.', background='#E0E0E0', command=press_num_ope_event_handler('.'), **button_params)
    decimal.place(x=90, y=270)
    equal = Button(root, text='=', background='#FFFFFF', command=press_equal_event_handler, **button_params)
    equal.place(x=150, y=270)
    plus = Button(root, text='+', background='#FFFFFF', command=press_num_ope_event_handler('+'), **button_params)
    plus.place(x=210, y=270)

    root.mainloop()


if __name__ == "__main__":
    main()
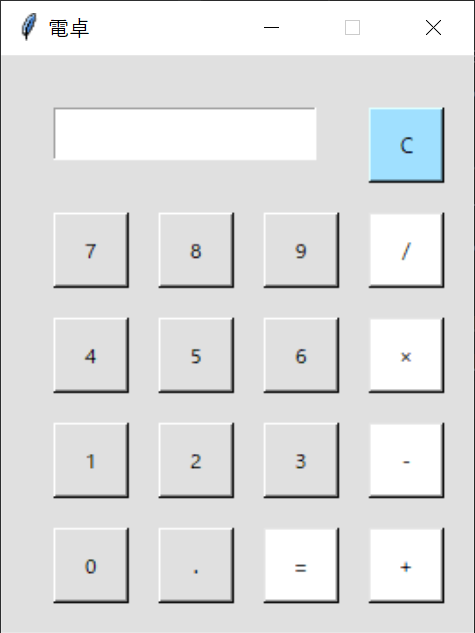
座標やボタンの数、色以外でプロトタイプとの大きな違いは次のとおりです。
まず、ボタンの見た目は電卓っぽく四角くするため、以前解説したPhotoImageを使用しています。色などボタンのパラメータが増えたため、button_paramsという辞書でまとめて指定しています。また、エントリーは数字を扱うため、実物の電卓同様、右寄せにしています。前回のプロトタイプが理解できていれば今回のコードは比較的簡単に感じた方も多いかもしれません。
上のコードを実行すると、以下のような電卓デスクトップアプリが起動します。